You’ve moved into your new house. The beds are made, the kitchen unpacked, and the internet signal strong. Now it’s finally time to address all of those empty walls and start making your new house a home. Where and how do you start?
It can feel daunting to be surrounded by all of that blank wall space. You may be hit with a fight-or-flight response—either grab a hammer and start hanging art and photos haphazardly, or cover your eyes and run! Before you panic and resort to either response, however, take a deep breath and a few minutes to develop a plan.
- Unpack all of your wall art and décor and sort by type. You may know exactly which rooms you want some to go, but don’t necessarily assume that just because it hung in a certain room in your former home that it has to be placed in that same location in your new home.
- If you do want to replicate certain areas from your former home, print off reference pictures to have at hand.
- Assemble the tools you will need: hammer, level, tape measure, pencil, assorted sized nails and/or picture hangers/hooks, wire, painter’s tape, step ladder, Mr. Clean Magic Eraser sponge, your favorite playlist.
- Assess the wall space in your new home. Identify small areas ideal for a single piece and reserve larger areas that will serve better to highlight a collection of items. Consider lighting, furniture placement, and traffic patterns. Remember to place your favorites where you’ll see them often, and don’t feel obligated to cover every inch of wall space.
- Like items create more impact when grouped together, rather than being spread throughout the home.
- Don’t be afraid of making nail holes in the wall—they are easily patched. This isn’t the tires of your new car we’re talking about here. If you don’t like the placement of something after it has been hung, just make a new hole in the wall and rehang it!
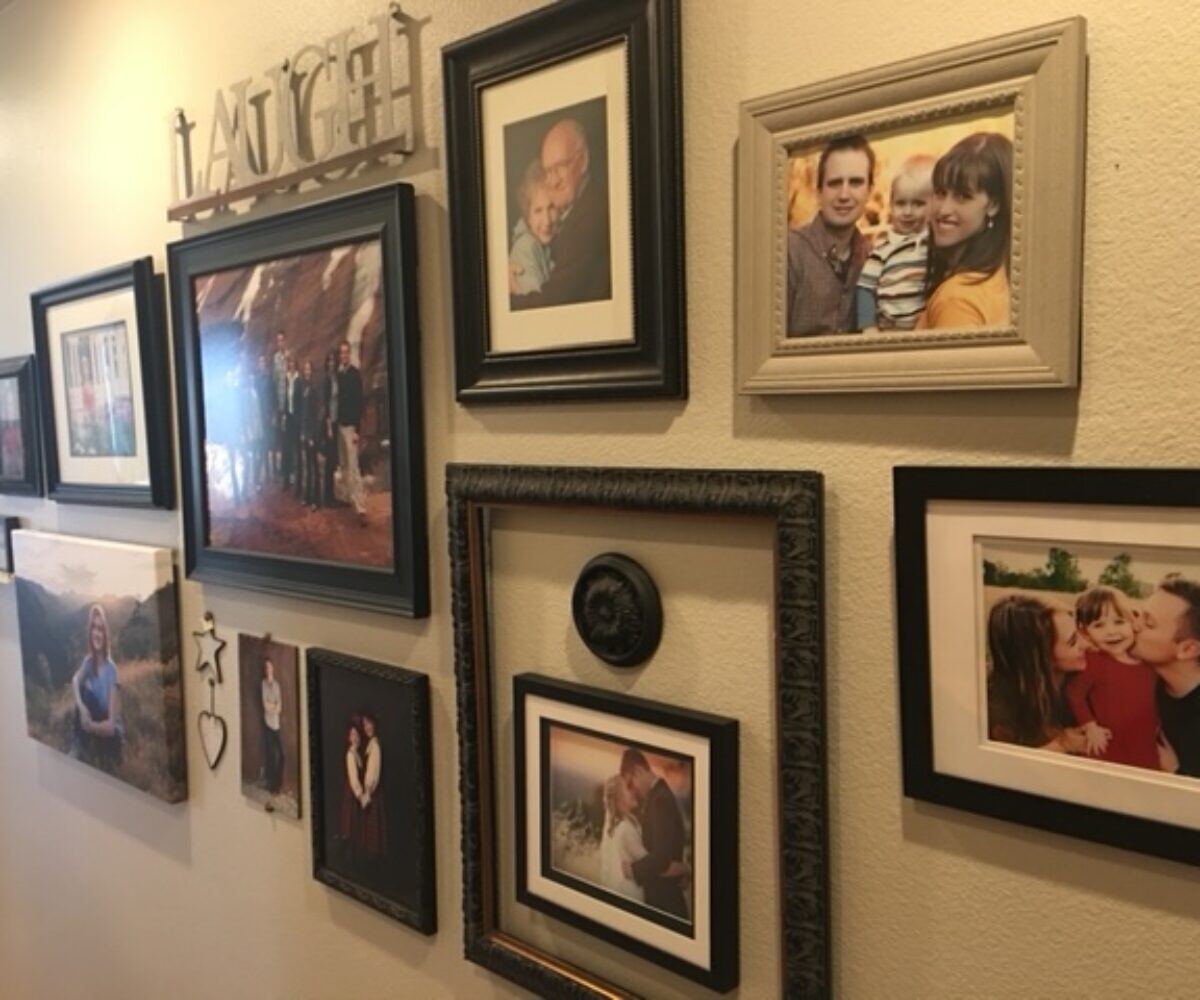
When it comes to creating a family portrait gallery or hanging a collection of other types of memorabilia, choose a large expanse of wall, or even two smaller adjacent walls. Design your collage prior to hanging even the first piece, using the simple technique outlined below. You’ll save not only time, but frustration.
1. Use large portraits when possible. Consider using large mats for framing smaller photos, and select frames of varying sizes but of similar color.
2. Find a few non-photo elements to work into the collage, such as wall ledges, mirrors, favorite words, or architectural pieces.
3. Measure the size of the wall where your collection will hang—not the entire wall, just the space in which you wish the art to occupy. Mark the borders and midline of the area with painters’ tape. Now find a spot on the floor somewhere where you can measure out this same amount of space and mark off the borders with painters’ tape. You’re going to design your collage on the floor first, then transfer it to the wall.

4. Before you start laying out your design within the bordered area on the floor, use the painters’ tape to mark the center, or midlines, of the area. This mark will be the point from which you will begin measuring when you hang the art pieces.
5. Now you’re ready to start creating your collage within the larger taped-off “canvas” on the floor. Starting at or near the center lines, begin placing your pieces as you see fit. Sometimes it’s helpful to stand on a chair or stool to get a bird’s eye view of the arrangement as it comes together, or to take progress photos of it so that you can better identify areas that may need tweaking.

6. Once you’re happy with the overall composition of your collage, take a moment to sketch it out on paper, noting the rough measurements between each photo or piece of art. Take a final photo of the laid-out collage on the floor to use as a reference as you begin to transfer it to the wall.
7. Again, starting with the object closest to the center mark, transfer it to the wall, using the measurements from your hand-drawn schematic. For example, your first piece might be 4″ to the right of vertical center and 8″ up from the horizontal center. Once the first piece is hung, continue referencing the diagram and measuring between the framed pieces on the wall to get the correct placement. Don’t be afraid of making pencil marks on the wall, as the Mr. Clean Magic Eraser sponge (when wet, lightly applied) will quickly remove them.


8. Once all the artwork and/or photos have been hung, remove the tape from the wall and floor. Step back and enjoy! You’ve created a one-of-a-kind wall collage, and your house suddenly feels more like your home.


Whether you’re looking to size up or scale down, Sheffield has a home plan that will work for you. We’ve been building homes in the Denver metro area and in northern Colorado for more than 40 years and have the expertise, experience, and trade relationships to make your home dreams a reality. Call us today and let’s start building your future! 303-420-0056


